

Introduction to Garden Design
Learn basic garden design techniques and how to create a healthy and attractive garden.
Garden Design is one of 10 online courses we offer in our Horticulture Distance Learning Program.
Next course: August 25 - October 16
- Cost: $675.
- Enrollment limited.
- Register online.
- To be notified of next course, fill out this form.
- Questions about the course? View FAQ, then email dmc72 [at] cornell.edu (dmc72[at]cornell[dot]edu)
- Registration details and refund policy
About the course
This online course includes six weeks of content plus an additional Introductory Week, Finals Week, and break week, and provides an opportunity for you to design your own ornamental landscape. It is a garden design course for the beginner.
Upon completion of this course, you will:
- Perform site analysis, collect site data and determine environmental elements of a proposed garden space, and use this data to create a base map that will serve as the foundation of a garden plan.
- Determine garden and landscape styles and designs that are appealing.
- Articulate a personal style and functionality that meets individual needs and garden goals.
- Identify and apply garden design principles for proper plant selection, placement, and seasonal interest.
- Recognize an ecological approach to garden design though diversity and inclusion of native plants and plants that attract beneficial wildlife.
- Utilize design strategies to deter unwanted wildlife and invasive species.
- Create and present a personalized garden design with hand-drawn or digital graphics.
This online course teaches the basics of preliminary site analysis and ornamental garden design techniques. Participants learn how right plant right place principles provide the foundation for a healthy and attractive garden design.
This class is asynchronous and self-paced in its design, where single topics are opened each week, and build upon each other. Participants complete assigned lessons and readings, participate in online group discussions, do hands-on activities, and submit design work and reflective journals. Most students spend approximately 10-15 hours each week with the content, however more time may be needed to explore additional resources added each week.
- Introductory Week: Welcome and Introduction
- Week 1: Site Assessment I
- Week 2: Site Assessment II; Design Beginnings: Personal Style, Garden Unity and Maintenance
- There will be a week-long break between Week 2 and Week 3
- Week 3: Design Principles I: Scale and Proportion, Balance & Symmetry, Repetition, Movement
- Week 4: Design Principles II: Color, Form and Texture
- Week 5: Design III: Your Garden Design: Choosing Plants
- Week 6: Design IV: Final Garden Design Project
You will not be able to access beyond two weeks after the last day of class.
Instructor: Donna Alese Cooke: dmc72 [at] cornell.edu (dmc72[at]cornell[dot]edu)
Purpose
This online course teaches the necessary steps to create a healthy & attractive garden. Participants study and experiment with basic design techniques and procedures and discover garden designs that will suit their personal needs and gardening goals.
Course Objectives
Upon completion of this course, you will:
- Perform site analysis, collect site data and determine environmental elements of a proposed garden space, and use this data to create a base map that will serve as the foundation of a garden plan.
- Determine garden and landscape styles and designs that are appealing.
- Articulate a personal style and functionality that meets individual needs and garden goals.
- Identify and apply garden design principles for proper plant selection, placement, and seasonal interest.
- Recognize an ecological approach to garden design though diversity and inclusion of native plants and plants that attract beneficial wildlife.
- Utilize design strategies to deter unwanted wildlife and invasive species.
- Create and present a personalized garden design with hand-drawn or digital graphics.
Course Philosophy and Approach
This course focuses on exploration of basic garden design techniques that will encourage self-expression through hands-on activities, design work, group discussion, and reflective writing. We present the proper steps of site assessment, with hands-on activities that demonstrate a property’s ecosystem, characteristics, and existing elements. Participants use real-world design techniques and strategies of proper plant selection and placement.
Expectations
This class is asynchronous and self-paced in its design, where single topics are opened each week and build upon each other. Participants are expected to keep up with weekly assignments and activities, participate in online group discussions, do hands-on activities, and submit design work and reflective journals. An online presence through interactive discussion forum is essential. It provides an opportunity to ask questions while learning and growing together with classmates.
Students spend approximately 10-15 hours each week with the content and assignments, however more time may be needed to explore additional resources added each week. For peace of mind and time management, we suggest that each assignment is submitted by its due date. Given the flexible nature of a distance learning environment, it is easy to fall behind and lose out on what could be a very valuable learning experience. Being well organized and current with assignments help participants get the most out of this course.
Lessons and Assignments
Weekly topics open each Monday, and required assignments are generally due on or before the following Monday. Each weekly topic contains lessons and include the following components:
- A series of lessons that present each weekly topic.
- Readings and videos to reinforce or expand upon the material presented.
- Hands on activities and assignments that help you develop a proposed site.
- Reflective writing that cultivates a thoughtful perspective and dialogue with the course instructor.
- Discussion forums to expand on topics, ask questions, and share ideas with others.
- Additional and optional readings, activities, and resources.
There are site assessment exercises at the beginning of the course that take place outdoors and require some time and planning to complete. Students who begin and complete these exercises in a timely manner will experience success in this course. Once your site assessment is completed, most of the work can be accomplished indoors and does not require planning around weather and outdoor accessibility.
The final project is a completed garden plan which will reflect your evolving experience and information that you have learned throughout the course. The specific design, style, as well as the mode of executing the final plan will be a matter of your choice and preference.
Required Textbook
Our main text is the 2023 edition of the Encyclopedia of Landscape Design: Planning, Building and Planting Your Perfect Outdoor Space by Chris Young (published by DK). There will be chapters assigned with lessons as we move through the course. During the first few weeks we will use The Site Assessment Workbook, by Charles Mazza, which is provided as a .pdf in the Moodle course.
Materials and Supplies
Students will be sketching and drafting garden designs by hand, with templates, paper, overlays, colored markers, pens, and pencils. Google maps and surveyor maps of a property are helpful to have to create a base map, then overlays of tracing paper are used to sketch ongoing assignments. However, students who are more comfortable using a CAD program, Canva, design app, or other digital method, are welcome to use that for the drafting process and final design. Feel free to use a blend of both. No art or design experience required!
For hand-drawn designs we suggest:
- Drawing paper and grid-lined paper (to help drawing a plan to scale) and tracing paper for overlays. Paper size depends on the size of the garden area.
- A circle template with a good variety of sizes. A template with extremely large circles may not be needed, and a drawing compass can be used for very large circles. This is crucial when drawing plants on the plan.
- A Basic Set of Colored Pencils or Markers.
- Black Sharpies, one thin and one thick will usually cover all needs.
Also helpful:
- A designated garden notebook as a place to store ideas, plant lists, budget items, prices, and observations.
- A computer with reliable high-speed Internet access (to view videos, view readings, submit assignments, and participate regularly in discussion forums).
- A device for scanning and/or photographing submissions of the final garden design.
What students say:
“This course was amazing, and I’m very glad I found it. I’m grateful for the well-organized structure of the course paired with the flexibility and accessibility of the instructor. The course was really easy to navigate and would say that the course has exceeded my expectations. The most valuable aspect of this course for me was learning how to approach a big garden design project and how to break it into smaller, more manageable tasks, and the steps I should take for assessing a site before I start any planning and strategies for design ideas.”
“This experience has opened my eyes to many aspects for consideration when designing future gardens. I now recognize the importance of properly assessing the site and clearly comprehending the intentions, concerns, and goals of clients prior to jumping in, saving all involved from wasting precious time, effort, and money.”
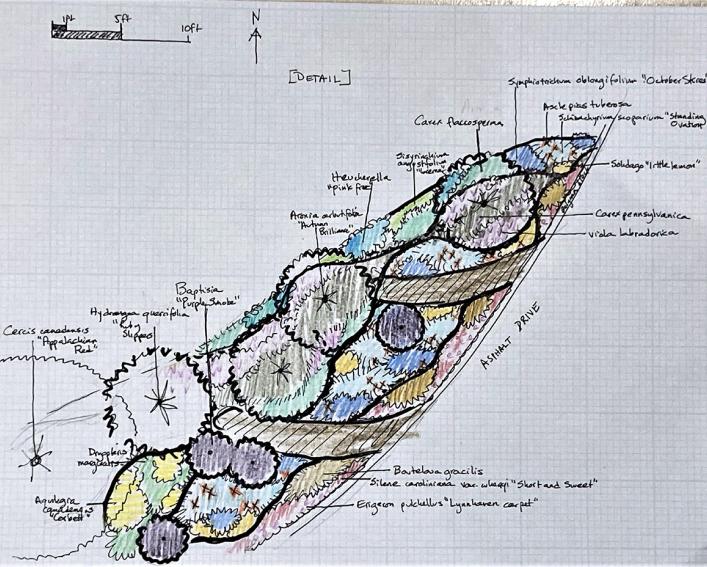
Sample garden plans
Beth Ricciardi's garden plan
For her course project, Master Gardener volunteer Beth Ricciardi used overlays to sketch out plantings that straddle an asphalt driveway at the Science Museum of Long Island. She made this detailed sketch of perennial locations on one side of the driveway.
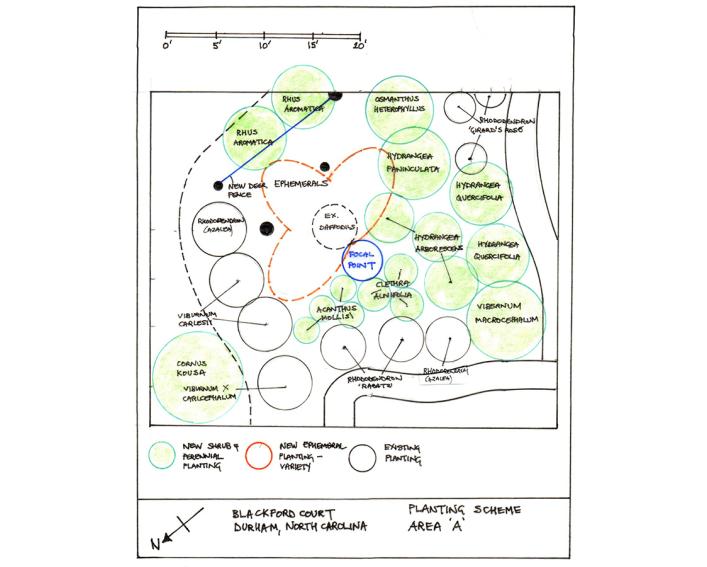
Sample garden plans
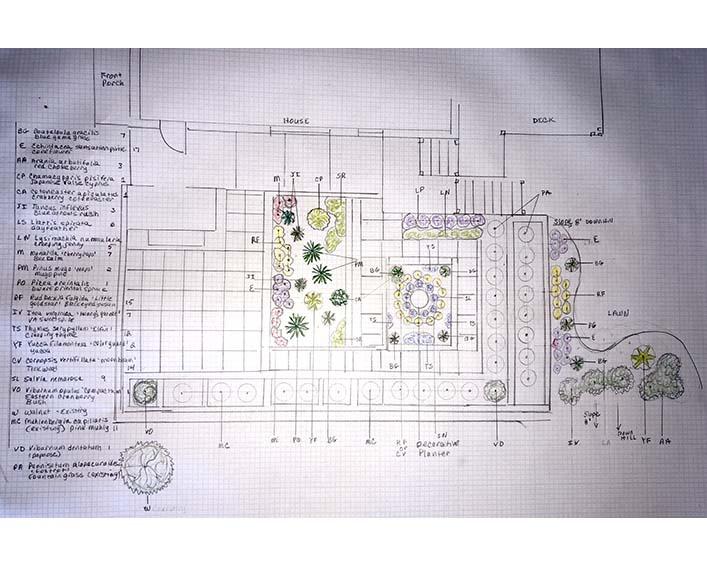
Brian Dabson's garden plan: Planting scheme details
Brian was very thorough with his site assessment activities and made very detailed maps of his North Carolina home garden.
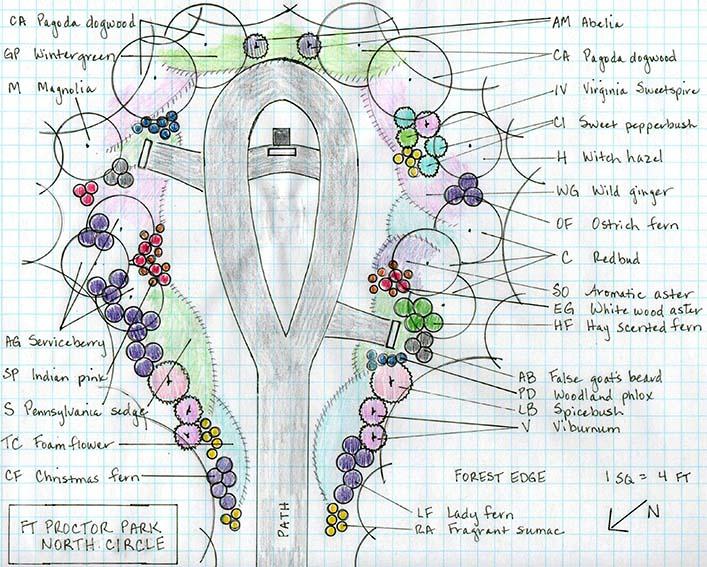
Sample garden plans
Amy Funkhouser: Public park plan
Amy created a landscape design for a portion of a public park in her neighborhood.
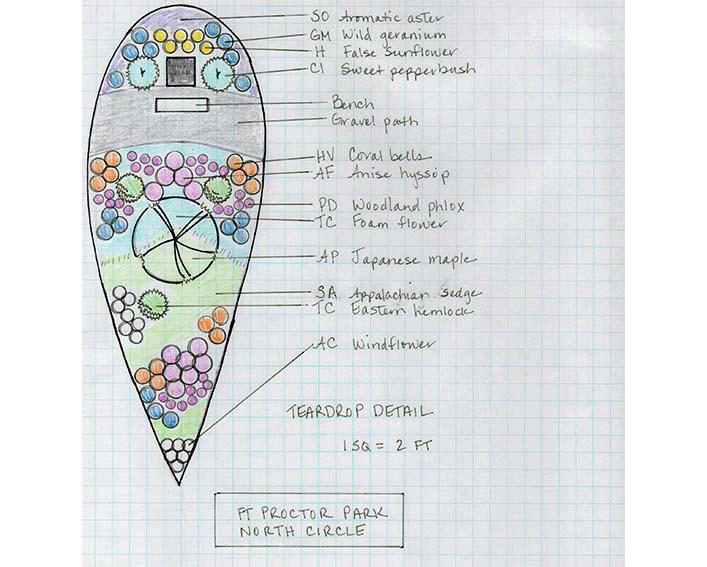
Sample garden plans
Amy Funkhouser: Public park plan detail
Amy's plan included a detailed design for the teardrop-shaped area in the center of the park.
Sample garden plans
Kunghwa Kim: Digital landscape plan
Kim used digital techniques to create a landscape plan for her new home in South Korea.
Sample garden plans
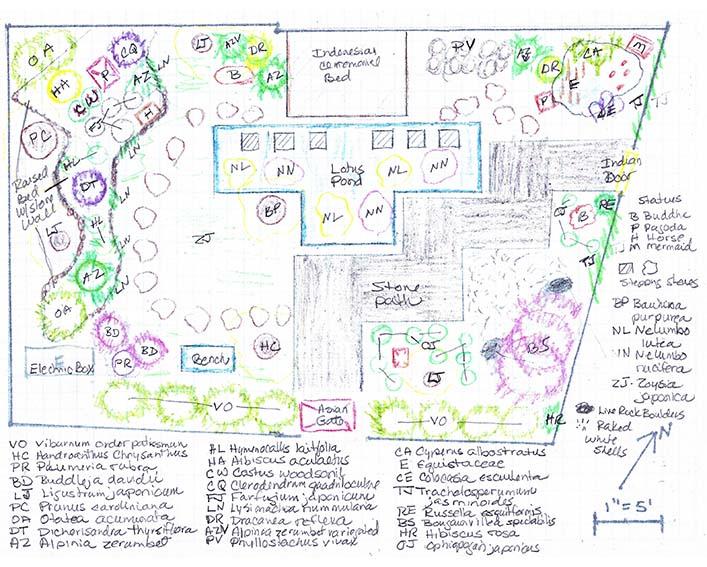
Laura Cosgrove: Tropical garden design
Laura's plan was influenced by her travels in Indonesia and includes many tropical species.
Sample garden plans
Sharon Shutler: Low-maintenance landscape
Sharon produced a detailed landscape plan focused on low-maintenance plantings for her vacation home.

More Horticulture Distance Learning Courses
- Permaculture 1 Fundamentals of Ecological Design
- Permaculture 2 Ecosystem Mimicry
- Permaculture 3 Design Practicum
- Botanical Illustration 1 Basic Drawing Techniques
- Botanical Illustration 2 Working with Watercolor
- Botanical Illustration 3 Advanced Techniques
- Organic Gardening
- Introduction to Garden Design
- Planning a Successful School & Community Garden Program
- Teaching and Learning in the School Garden
- Climate Solutions: Permaculture Fundamentals for Educators